|
|
 Quick start for MMSSTV Graphicsv.080801 by Joe Hutchens, WJ5MH
Graphics Part I
|
||||||||||||||||||||||||||||||||||||||||||||||||||||||||||||||||||||||||||||||||||
| Select "Template" window.. |
|
| Select "All delete" in the Template menu to remove any existing Template from the "Template" window. |
|
| Place cursor over "Template" window. Right click. Template menu should appear. Turn off "Show TX picture" for now if it's on.
(Checkmark is on. No checkmark is off.) |
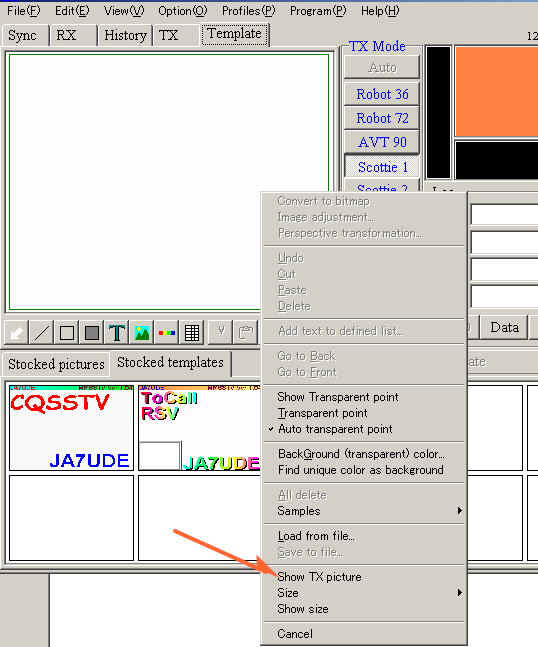 |
You can use the "Show TX picture" later to position your text correctly over the picture you want to transmit.
(Once you make a selection, the Template menu will close, so if you need to make another change to this menu, you'll need to right click on "Template" window again.)
| Select the Red, Yellow, Green, Blue bar (Draw Color Bar icon) from under the "Template" window. | 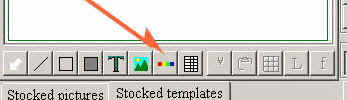 |
| Move + cursor to upper left hand corner of "Template" window.
(Lines of + cursor will change color when over the outline of the entire "Template" window to let you know you're right on the corner. My lines change to pink.) Left click. |
|
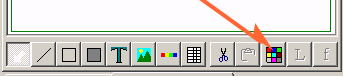
| Select multi-colored box (Set Color icon) to the right of Scissors and Clipboard icons. |
|
| This is where you color the bar or add a 16(h) x 320(w) bitmap picture. We'll just add two tones for now, which should be default. The original default colors should be black and white, but you can change these by clicking over the colored box to select new colors. You will see other selections, but Two Tones should be selected. Play with other selections later. Select "OK." (You will not see colors in the "Color bar" yet.) |
 |
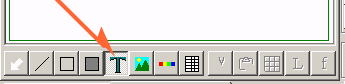
| Select "T" for text. (Now you will see the "Color bar" with the colors you selected.) Move + cursor to bar area. (You don't have to be exact. We can move text later.) Left click. |
 |
| Oh boy... | |
| Select "Macro." |
|
| Select "%m." (Should be your call sign.) |
|
| Select "Font." Select "Size 9." (Small number, small letter.) You can select "Bold" if you wish. Select "OK." With version 1.04, you can now see how each option affects the text. Once you're satisfied with how the text looks, select "OK." (Try not to use the other options |
|
| Your text will now appear in the "Template" window in a small dashed box. Position the text into the "Color bar" by placing cursor over text. Hold down left mouse button and drag. Continue to move text until you're happy with placement. |
|
| If the text is too large, or you don't like the color, you can edit it by selecting the multi-colored box (Set Color icon). |
|
| Now, left click mouse anywhere in "Template" window away from the "Color bar." You should now see the bar at the top of "Template" window with your call sign. Now right click over "Template" window. Select "Save to File." Name file whatever you like. |
 |
Now, you can use this file to place over any picture you like.
| Select "Stocked Templates" Right click over "Stocked Template" window where you wish to add the Template. Select "Load from file." You should see your previously named file listed. Double left click and you're in. |
 |
| An alternative way is to just drag and drop the template from the template window to the Stocked templates box. | |
I suggest you play with this a few times and make several different Templates to get the hang of it.
You can also use this information to modify the two samples included with v1.04. After you modify the samples, remember to save them with the file name of your choice. To select any area of the "Template" window to modify, use the Arrow icon to the far left under "Template" window.
Graphics Part II
| Let's start with a clear "Template" window. Select "Template." Center cursor over "Template" window. Right click. Select "All delete." |
|
| If you have a picture in the "Template" window, let's clear it. Center cursor over "Template" window. |
|
The "Template" window should now be white.
(If you have selected another background color, the window will be that color.)
Now let's load your standard "color bar" created earlier.
| Right click over "Template" window. Select "Load from file." Double left click over file you wish to load. |
 |
| An alternative way is to just drag and drop the template from the Stocked templates box to the template window. | |
You should now see your "color bar" across the top of "Template" window.
Let's modify Template with some text.
| Position cursor over "T." Left click. Move + cursor to a position on left side of "Template" window. You can select an exact location, but we can always move it. Left Click. The "Text & Colors" screen should appear. |
|
| In the Text window, type "Hello" followed by a space. Select "Macro." Highlight "%c." Select "Insert." Version 1.04 will show a text preview on the right side of the "Text & Colors" screen. |
|
| Let's change "Gradation." Select "None" and note single color. Place cursor over color square. Left click. Select another color. Select "OK." |
 |
EASY!!!!! So let's continue.
| Select "Vertical." Select "Components." You have 8 preset color combinations to choose from. Select "8." Select "OK." |
|
| I don't like green. Place cursor over green. Left click. Select yellow. Select "OK." |
|
| I now have Yellow, Yellow, Orange, and Red. (Just a quick demonstration on how to change colors.) |
|
| Let's try the "Shadow" option. Select them one at a time and see the difference they make in the text. The shadow color can be change by clicking on the box and selecting a new color. |
|
| Put a checkmark in "Slash Zero." Put a checkmark in "Perspective." Look at the text. By changing "Rotation," you can manipulate the text. Put a checkmark in "3-D." |
 |
Now, you can play with "Perspective" and "3-D" on your own time. It's important to remember that the Template background color WILL interact with these two features. I don't recommend a white background color, because white dots will appear around your text once the Template is superimposed over a picture. You may even be able to see the white dots on the "Text & Colors" screen.
Remove the checkmarks from "Perspective" and "3-D."
| While we're here on the "Text & Colors" screen, note "Right justify." Simply put, new text will cause old text to move to the left. Here is an example. Hello %c will print "Hello" followed by "ToCall" on the screen. ("ToCall" is automatically replaced by any call sign that is written to the log or is received automatically via the RTTY ID feature.) If you click "Right justify" and align the text on the right side of the window, all text will end at the same spot in the window. Everyone has a different length call sign. If a call is longer than the last one displayed, "Hello" will move to the left. |  |
Clear as mud.
To add more text, click on the "T" and start again.
The text editor isn't for writing long sentences. They'll run clear off the screen.
Today, word-wrap is not a feature of this program.
Remember, right click on the "Template" window and "Save to file."
Give it a different file name if you wish.
| Note that you can re-select anything in the "Template" window and modify it. Look for the Arrow icon to the left under the "Template" window. (It points down and to the left. Select the Arrow. Place it over whatever you want to modify. Left click. A box will mark the object. To modify the text selected, select the multi-colored box (Set Color icon) from the row of editing icons. |  |
Well, I hope I haven't confused anyone, but I can see how someone without any graphics experience would have a difficult time. It takes practice. This should be enough to get you going. If you have any question, drop me a note.
Good luck and have fun learning. And remember to turn off your auto slant adjustment feature, and calibrate MMSSTV to WWV. The feature, if left on, is a computer hog, and it's becoming a real source of confusion for the new guy on the block.
Graphics Part III
So now that you have a couple Templates saved, let's put the last one to work for you, and modify it a little. But first, let's make sure you can load a picture into the "Stocked pictures" area at the bottom of the screen.
| Place a checkmark in "Show with Template." Remove any checkmark in "Draft." |
 |
Before we proceed, you have to know where the pictures you want to send are currently stored on your computer!
Better check.
The "Stocked pictures" area is separated in 25 groups of 6 pictures each.
You use the Arrows on the right side to move left or right through the series of groups.
| Select a blank slot in "Stocked pictures." Right click mouse button. Select "Load from file." You'll see the standard file selector. Now, go to the directory where you keep your pictures, and select a picture you would like to load. (One click will give you a preview, and a double click will bring up the MMSSTV graphics manipulator called "Picture Clipper.") |
 |
The "Picture Clipper" gives you a couple options you'll need to become familiar with. Basically, it automatically sizes the picture for transmission. AND, it allows an area for the "Color bar."
Here are the buttons I have selected for my personal use with this program.
| There are three icons on the left. The first icon doesn't allow for any "Color bar" open space. (However, I suspect that a Template could be placed over the picture, but some of the picture would be blocked.) The second allows open space at the bottom, and the third, which I use, allows for open space at the top of the picture. The icons really speak for themselves. |
 |
| I also have selected H/W (Aspect ratio), and "Stretch mode - color on color."
The Red, Green and Blue icon with the arrow can be used to adjust contrast, brightness, etc. |
|
It's important to remember that large pictures look fair when made smaller, but small pictures don't look all that great
when enlarged. As mentioned earlier, I like to work with an external graphics program, and size my pictures there,
so resizing isn't required in MMSSTV.
If you have the process down, you now have a picture stored in the "Stocked picture" area.
Now, let's load a Template in the slot that corresponds to the picture just loaded. (For example, let's say we loaded
our picture in the last slot on the right.)
Select "Stocked Templates."
Move mouse cursor to the far right or last slot, and right click.
Select "Load from file." (Note: All Templates are saved as .MTM files.)
Select one of the Templates you made earlier. Template should now be seen in "Stocked Templates" slot.
You can use Drag and Drop to move the template from the Stocked templates area to the template window.
| Select "Stocked pictures." Now, you will see the picture with your Template. Remember, you have to have "Show with Template" turned on as mentioned at the beginning of Graphics Part III. |
|
| Select the "TX" window. Place cursor over picture in "Stocked picture" area. Hold the left mouse button and drag picture to "TX" window. Now you'll see the picture and Template in the "TX" window ready to transmit. But wait. Don't you want to add your name to the Template? |
|
| Select "Template" window. Right click over window. Make sure "Show transmit picture" is checked. (You need to see the picture to make sure any Template graphics you add don't block key parts of the picture.) |
|
| From the Template icons, select "T." |
|
| Move + cursor to "Template" window and left click. "Text & Colors" window will appear. Type in, "Chief Op: Your Name." Edit the look of the text, as you like. When done, select "OK." |
|
| There will be a block around the text. While this text is marked with dashed lines, you can hold the left mouse button over the text a drag. Position as you like. |  |
Move mouse cursor over unused area of Template (over picture where there isn't any Template text) and left click.
Hey, this picture is ready to transmit. Select "TX" window and go.
It's important to note here that we loaded a picture and Template and then modified it, but we didn't save the changes we made to the original Template. We just added your name to the Template window on the run, so to speak.
Remember, we have only explored the basics. There are more features and some shortcuts.
We've reached "The End," and I sincerely hope that I've helped make MMSSTV a little easier for you to use. If you need additional help, e-mail your questions to me through the Users Group.
Thanks and 73,
Joe ( WJ5MH )
Copyright © 2000-2026 VE5KC & KtecK Webs - All rights reserved.
Privacy Statement | Monitored by SiteUptime